
Move a WordPress site to FlyNode in about 5 minutes, with its database, from any host. You install one small plugin, paste a code, and press one button. Your old site is not touched, so there is nothing to lose.
Download the plugin (send-to-flynode.zip)
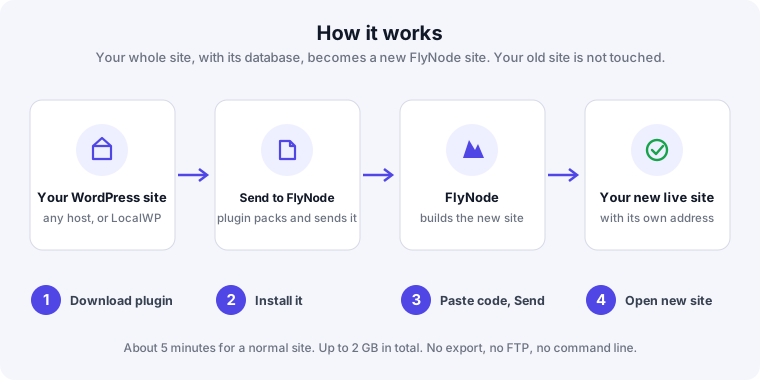
Before you start
- A FlyNode account with an active Cloud Workspace.
- Admin access to the WordPress site you want to move (you can install plugins on it).
- The site should be under 2 GB in total. If it is bigger, you can leave out the media library and add it later (the plugin has a box for it).
Step 1. Download the plugin
Click the button below and save the file. Do not unzip it.
You can also find the same file in FlyNode: Add New Project > Import a WordPress site.
Step 2. Install it on your old site
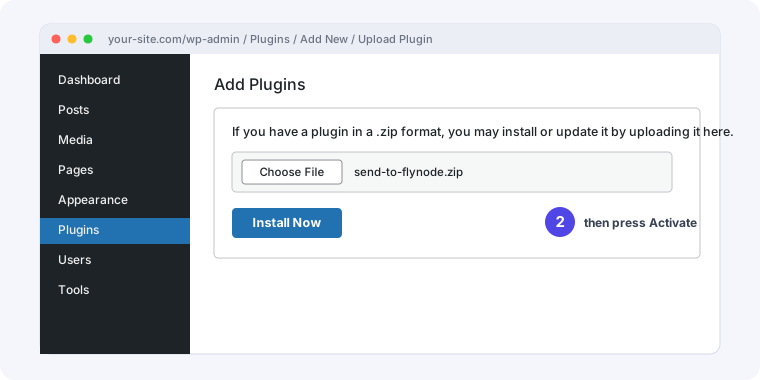
- Log in to the WordPress admin of the site you want to move.
- Open Plugins > Add New, then press Upload Plugin.
- Choose
send-to-flynode.zipand press Install Now. - Press Activate Plugin.
Step 3. Get a transfer code in FlyNode
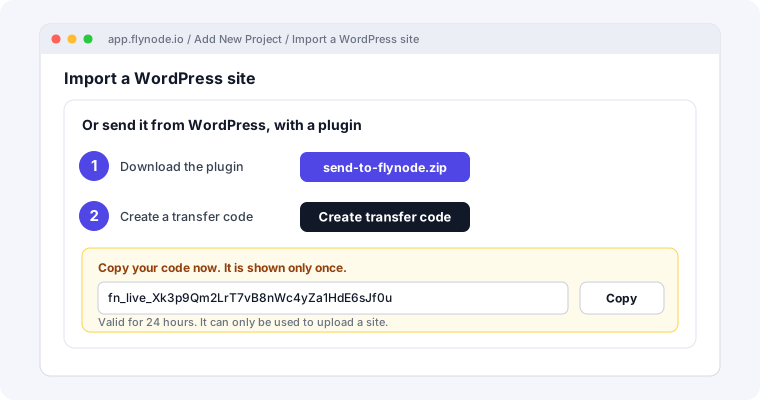
- Sign in at app.flynode.io.
- Press Add New Project, then choose Import a WordPress site.
- Scroll to Or send it from WordPress, with a plugin and press Create transfer code. (If you have more than one Workspace, pick the one the new site should go in first.)
- Press Copy. The code starts with
fn_live_. It is shown only once, works for 24 hours, and can only be used to upload a site, nothing else.
Step 4. Send the site
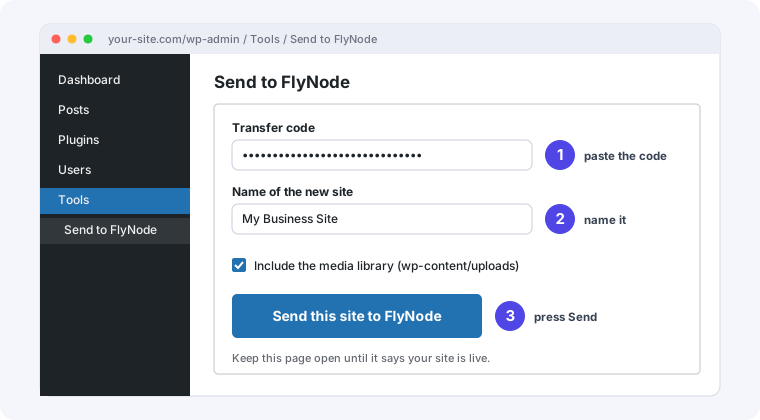
- Back in your WordPress admin, open Tools > Send to FlyNode.
- Paste the code.
- Type a name for the new site.
- Leave "Include the media library" ticked (untick it only if the site is over 2 GB).
- Press Send this site to FlyNode.
Step 5. Wait, then open your new site
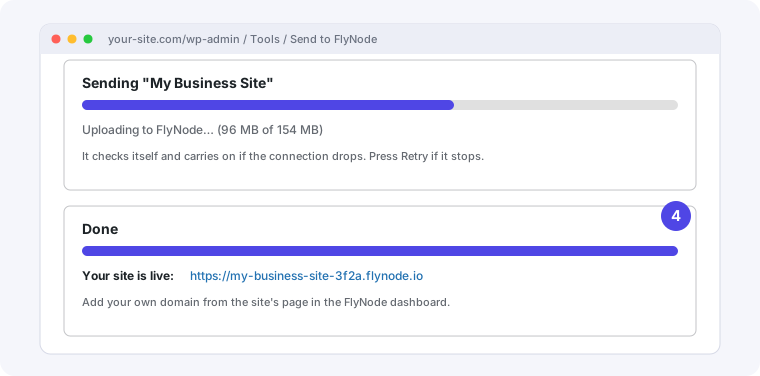
The page shows what is happening: exporting the database, packing your files, uploading, and then FlyNode building the new site. Keep the page open. A normal site takes a few minutes. If your connection drops, press Retry and it carries on where it stopped. When it says Your site is live, click the address to open your new site.
After it is live
- Look around the new site. Posts, pages, users, settings, themes, plugins and media are all there. Web addresses inside your content already point at the new address.
- Add your own domain from the new site's page in the FlyNode dashboard when you are ready. Keep the old site running until the domain points to FlyNode.
- You can delete the plugin from the old site any time. Its temporary files are removed automatically.
What is copied
| Copied | Left out on purpose |
|---|---|
| The whole database: posts, pages, comments, users, settings | Cache folders and log files |
Everything in wp-content: themes, plugins, media (unless you unticked it) | Other backup plugins' archive folders |
The old host's cache drivers (object-cache.php, advanced-cache.php), because they would break the new site | |
| Files whose path is longer than 255 characters, or over 1.5 GB each (the plugin tells you how many) |
If something goes wrong
| You see | Do this |
|---|---|
| "transfer code is not valid or has expired" | Create a new code in FlyNode (each lasts 24 hours) and paste it again. |
| "The packed site is over the 2 GB limit" | Untick "Include the media library", send again, and add the media later. |
| "multisite networks cannot be sent yet" | Send a single site, or use the browser upload below. |
| The plugin stops or the page says Retry | Press Retry. It continues from where it stopped, nothing is sent twice. |
| "could not reach FlyNode" | Your host blocks outgoing connections. Ask the host to allow outgoing HTTPS, or use the browser upload below. |
| FlyNode says it could not create the site | The half-made site is removed automatically, so nothing is left. The message says why (for example your plan's app limit). |
No plugin? Upload an export instead
If you cannot install plugins, export the site yourself and upload it in the browser. LocalWP: right-click the site, choose Export, keep "Include database" on, and you get one .zip. Another host: export the database to a .sql file (phpMyAdmin, or wp db export site.sql) and zip your wp-content folder. Then in FlyNode open Add New Project > Import a WordPress site, drop the file or files, name the site and press Upload and create the site.
Still stuck?
Open a support ticket from your dashboard and include the container name.