
This guide moves an existing MERN app (MongoDB, Express, React, Node) to a FlyNode Cloud Workspace. You will end up with your Node and Express server running as a Custom app, serving your React build, connected to a MongoDB database that you control.
How the pieces fit
- Express API and React front end: one Custom app. FlyNode builds your repository and runs it as a single container. The simplest setup is to let Express serve the built React files, so you deploy one app instead of two.
- MongoDB: stays with a managed provider such as MongoDB Atlas, or on a server you already run. A Custom app is one container and does not start a MongoDB for you, and apps on FlyNode cannot reach each other's databases, so your app connects to the database over its normal connection string.
Before you start
- Your code is in a repository on GitHub, GitLab or Bitbucket. For a private repository, read Deploy a Private Repository first.
- Your app starts with one command, usually
npm start. - You have a list of every environment variable the app reads: the MongoDB connection string, JWT or session secrets, API keys, and the public address of your front end.
Step 1: Get the code ready
Listen on the port FlyNode gives you. Your container is given port 3000 and the PORT variable is set to it. If your server reads process.env.PORT, nothing changes. If the port is written into the code, change it:
const port = process.env.PORT || 3000;
app.listen(port, () => console.log('Listening on ' + port));
We tested this with a sample Express app whose own default is 5000. On FlyNode it printed Listening on 3000 and opened on its address without any change.
Serve the React build from Express. Build the front end during the install or build step, then serve the folder and send every other route to index.html, so a page refresh on a React route does not return a 404:
const path = require('path');
app.use(express.static(path.join(__dirname, 'client', 'build')));
app.get('*', (req, res) =>
  res.sendFile(path.join(__dirname, 'client', 'build', 'index.html')));
Put this after your /api routes. If your front end is built by Vite, the folder is dist instead of build.
Add a build script at the top level. FlyNode reads the package.json in the root of the repository. A common layout is a root script that installs and builds the client:
"scripts": {
  "build": "npm install --prefix client && npm run build --prefix client",
  "start": "node server/index.js"
}
Step 2: Move the database
- Create a MongoDB database at your provider and copy its connection string.
- If the provider limits which addresses may connect (MongoDB Atlas does by default), allow your FlyNode server. If a connection is refused later, check this first.
- Copy your data from the old database. On your own computer run
mongodumpagainst the old database, thenmongorestoreagainst the new one. These are MongoDB's own tools, not FlyNode's. - Open the new database once and check the collection counts match.
Want MongoDB on FlyNode instead? A Custom app cannot start MongoDB, but Bring Your Own Compose can run your app and a MongoDB side by side. Your project needs a Dockerfile in a public repository, and the Database tab opens mongo-express so you can browse the data. It has no screen for uploading a dump, so a large existing database is easier to keep with a managed provider.
Step 3: Deploy the app
- Go to Deploy and choose Custom app.
- Enter an app name, choose Public repository or Private repository, paste the repository address and check the branch.
- Leave Advanced build options empty first. FlyNode detects Node projects on its own. Fill in the install, build and start commands only if the first deploy does not start.
- Press Continue, keep the generated domain, press Continue again and then Deploy App.
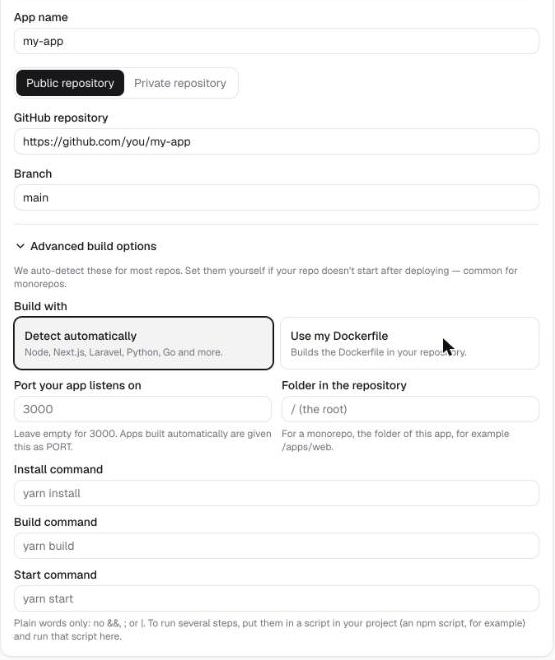
The first deploy has no variables yet, so the app may start and then fail to reach the database. That is expected. Add the variables next.
Step 4: Add your environment variables
Open the app, go to Settings and then Variables. Add each variable your app needs, for example MONGODB_URI, then press Save and redeploy. A variable is read when the app starts, so it only takes effect after a deploy. Paste a .env reads a whole file at once.
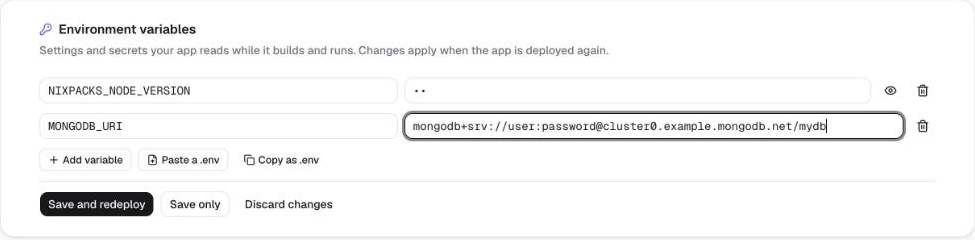
The Variables list also shows NIXPACKS_NODE_VERSION, the Node version FlyNode builds with. Change it there if your project needs a different version. For more on variables, see Build Logs, Environment Variables and Rollback.
Step 5: Check that it works
- Settings, then Deploys should show your build as Succeeded. If it failed, press View log to read why.

- The Logs tab shows what your app prints. Look for your own start message.

- Open the app's address and try a login and one page that reads from the database.
Step 6: Use your own domain
Add your domain from the app's Custom Domain tab and follow Custom Domains for Your Apps. After it is live, update the places that still point at the old address: the API address your React code calls, the allowed origin in your CORS settings, and any webhook or OAuth callback addresses.
If something goes wrong
- The build fails. Open Deploys and press View log. A missing build script or a wrong folder is the usual cause. Set the install, build and start commands by hand under advanced options.
- The app shows Running but the address does not open. The app is probably not listening on
PORT. Check the Logs tab for the port it prints. - The app crashes right after starting. Read the Logs tab. A missing variable or a database that refuses the connection are the most common causes.
- React pages return 404 on refresh. Add the catch-all route from step 1.
- Uploaded files disappear after a deploy. A deploy builds a new container, so files written at run time are not kept. Store uploads in object storage such as S3.
Next steps
- Deploy a Private Repository and redeploy on every push.
- Using the Terminal and Logs.
Still stuck?
Open a support ticket from your dashboard and include the container name.