
This guide moves an existing Next.js app that uses PostgreSQL to a FlyNode Cloud Workspace. The app runs as a Custom app built from your Git repository. The database stays on a PostgreSQL host you choose, and the app reaches it through a connection string.
How the pieces fit
- Next.js app: one Custom app. FlyNode builds your repository and runs it as a single container with a generated address and automatic SSL.
- PostgreSQL: a managed provider such as Neon or Supabase, or a server you already run. Apps on FlyNode cannot reach each other's databases, so the app connects to the database by its normal address. A Custom app does not start a Postgres of its own.
Bring Your Own Compose can run Postgres in the same stack as your app, but it is not the right path for moving existing data today. Your project needs a Dockerfile, because the compose file builds it from a Git address, and the Database tab opens pgAdmin on that Postgres in one click. There is still no screen for uploading a dump file into it, so for moving existing data use a managed provider as described below. See Bring Your Own Compose.
Before you start
- Your code is in a repository on GitHub, GitLab or Bitbucket. For a private repository, read Deploy a Private Repository.
npm run buildandnpm startwork on your own computer.- You know every environment variable the app reads:
DATABASE_URL, authentication secrets, API keys and your public site address.
Step 1: Check your Next.js setup
- Scripts. FlyNode builds with
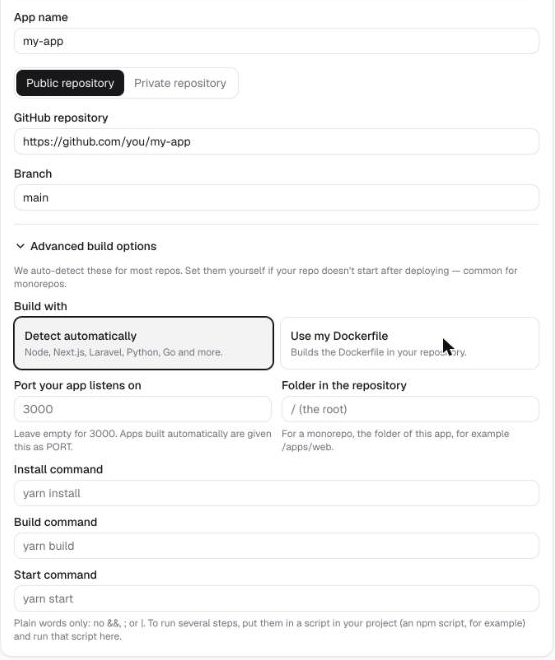
npm run buildand starts withnpm start, which runsnext start. It listens on thePORTvariable, and FlyNode sets that to 3000 for your container, so you do not need to change anything. - Standalone output. If your
next.configsetsoutput: 'standalone', set the Start command in advanced build options tonode .next/standalone/server.js. - Public variables. Variables that start with
NEXT_PUBLIC_are written into the build, not read at run time. Add them before the build runs, or press Save and redeploy after adding them. - Do not reach the database during the build. Pages that query Postgres while
next buildruns need the connection string to exist at build time. Either add the variable before the first deploy or render those pages on request.
Step 2: Move the database
- Create a PostgreSQL database at your provider and copy its connection string. Most providers require SSL, so keep the
sslmode=requirepart of the string. - On your own computer, take a dump of the old database:
pg_dump --no-owner --no-acl -Fc -f app.dump "OLD_CONNECTION_STRING". - Restore it into the new one:
pg_restore --no-owner --no-acl -d "NEW_CONNECTION_STRING" app.dump. - Check a few row counts in both databases before you switch.
These are PostgreSQL's own tools. If you use Prisma or Drizzle, you can also create the tables with their migration command against the new database and then copy the data.
Step 3: Deploy the app
- Go to Deploy and choose Custom app.
- Enter an app name, choose Public repository or Private repository, paste the repository address and check the branch.
- Leave Advanced build options empty first, unless you use standalone output (step 1).
- Press Continue, keep the generated domain, press Continue again and then Deploy App.
Step 4: Add your environment variables
Open the app, go to Settings and then Variables. Add DATABASE_URL and every other variable, then press Save and redeploy. Nothing takes effect until the app is deployed again.
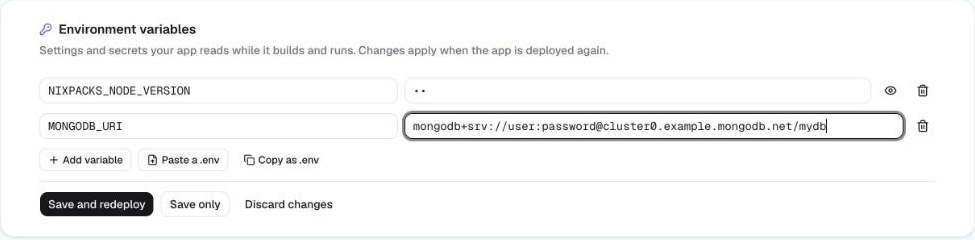
Two variables that people forget when they move a Next.js app: the public address your authentication library expects (for example NEXTAUTH_URL or AUTH_URL) and your own public site address. Set them to the new address. See Build Logs, Environment Variables and Rollback for how variables work.
Run migrations
If you use Prisma, a common approach is to put the migration in your start script in package.json, for example "start": "prisma migrate deploy && next start", so pending migrations run each time the app starts. The Start command box on FlyNode takes plain words only (no &&), so keep the steps in the script. Try it against a copy of the database first.
Step 5: Check that it works
- Settings, then Deploys shows the build as Succeeded. If it failed, press View log.
- The Logs tab shows the output of
next start. - Open the app's address, sign in and open a page that reads from Postgres.
Step 6: Use your own domain
Add your domain from the Custom Domain tab and follow Custom Domains for Your Apps. After it is live, update callback addresses for sign-in providers and webhooks so they point at the new domain.
If something goes wrong
- The build is killed or runs out of memory. Next.js builds need a few hundred megabytes or more. A Cloud Workspace shares its RAM between all of its apps, so stop other apps while you build or choose a larger size. See Understanding Resource Allocation.
- The build fails with a database error. A page is querying Postgres during the build and the variable is missing. Add
DATABASE_URLand deploy again. - The app shows Running but the address does not open. Check the Logs tab. The app must listen on
PORT. - The database refuses the connection. Check the connection string, that
sslmode=requireis present, and whether your provider restricts which addresses may connect.
Next steps
- Deploy a Private Repository and redeploy on every push.
- Migrate a MERN Stack App to FlyNode.
Still stuck?
Open a support ticket from your dashboard and include the container name.